
S.M.A.R.T. stands for Self-Monitoring, Analysis, and Reporting Technology. Practically that means that HDDs that support SMART can run self-tests to diagnose problems and report them to us. Although Greyhole can provide our NAS with redundancy, i.e. no data is lost if an HDD fails, it’s still good to know how healthy our HDDs are before we decide to use them and once they’re in operation. So in this post we’ll have a little look at how we can use SMART.
This post is part of a series about building a Network-Attached Storage (NAS) with redundancy using a Raspberry Pi (RPi). See here for a list of all posts in this series.
Basics
We’re going to use smartmontools1 to access the SMART features of our HDDs. Let’s plug in a HDD and have a look what information we can get. Note, there’s no need to mount the drive once it’s connected to the computer (although it won’t hurt if you do). The drive I’ve just connected, which I salvaged from an old Laptop, has path /dev/sdb. We can get some basic information about it with
sudo smartctl -i /dev/sdbwhich should return an output as shown below:
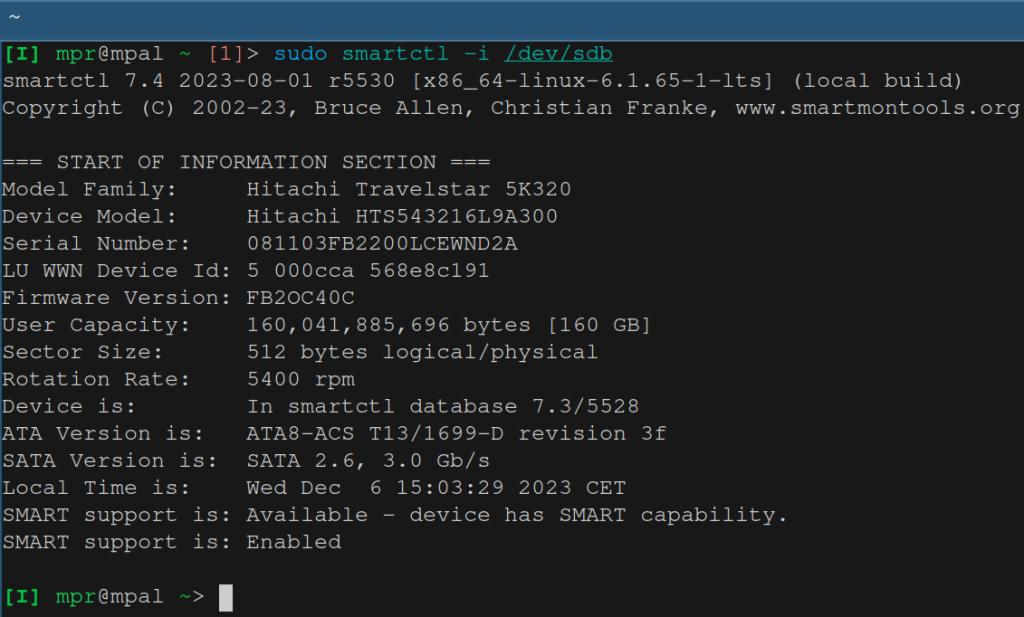
We’re mainly looking at the last two lines, which tell us that SMART is available and enabled. If it’s available but not enabled then you can enable it with
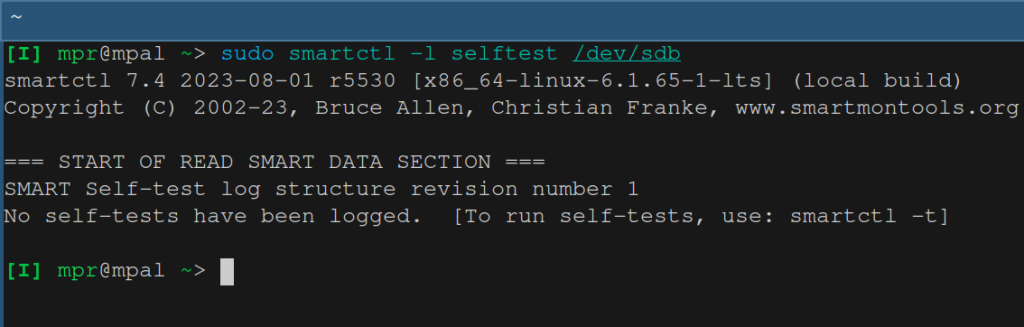
sudo smartctl --smart=on /dev/sdbLet’s now check if a selftest has been run before. We can use the command below to list selftests.
sudo smartctl -l selftest /dev/sdbI have never run a selftest on this drive so the output is
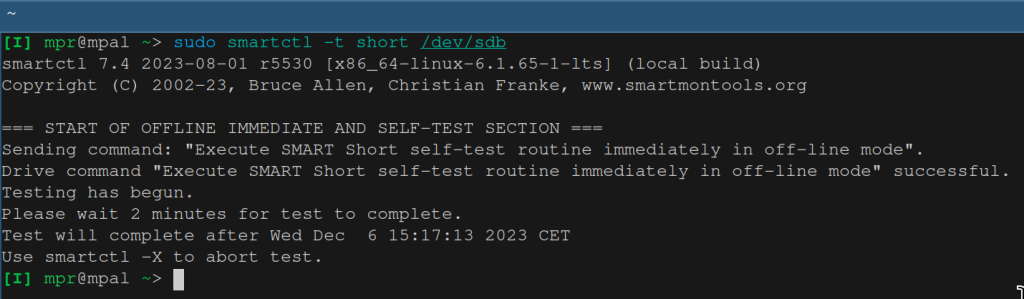
So let’s run a test to see how the drive is doing. There are a few options available. Let’s start with a short test. According to the man pages the short test “check[s] the electrical and mechanical performance as well as the read performance of the disk”.
sudo smartctl -t short /dev/sdbThis command starts the test and tells us to come back later (see the image below). The short selftest is fast (2 minutes for this drive) and it runs in the background. If you’ve mounted the drive then you can still use it during the self-test, although it may be slower than without the selftest. You can also run the selftest in the foreground with command sudo smartctl -t short -C /dev/sdb. In that case no partitions of the drive should be mounted.
After about two minutes we can list the selftests again.

According to the last line the test was completed without an error. That’s great! Let’s try to get a bit more information by running
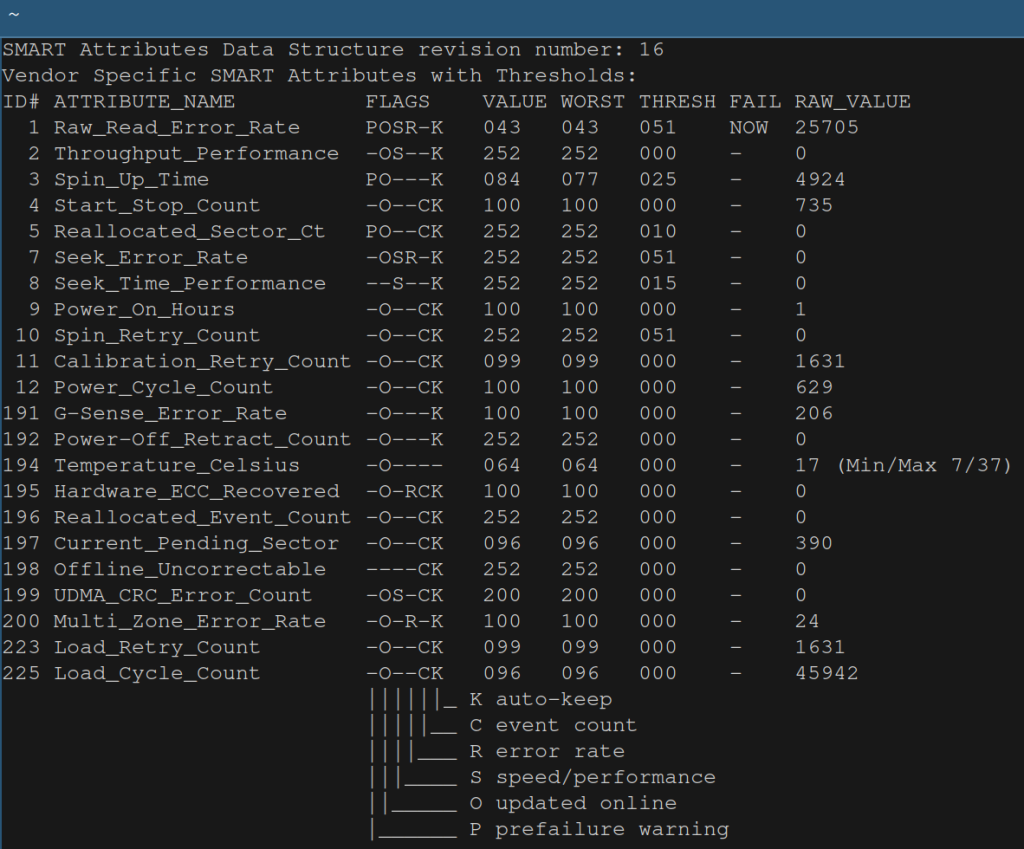
sudo smartctl -x /dev/sdbThe output of that command can be quite long. I’m going to focus on what I think is most important for us.
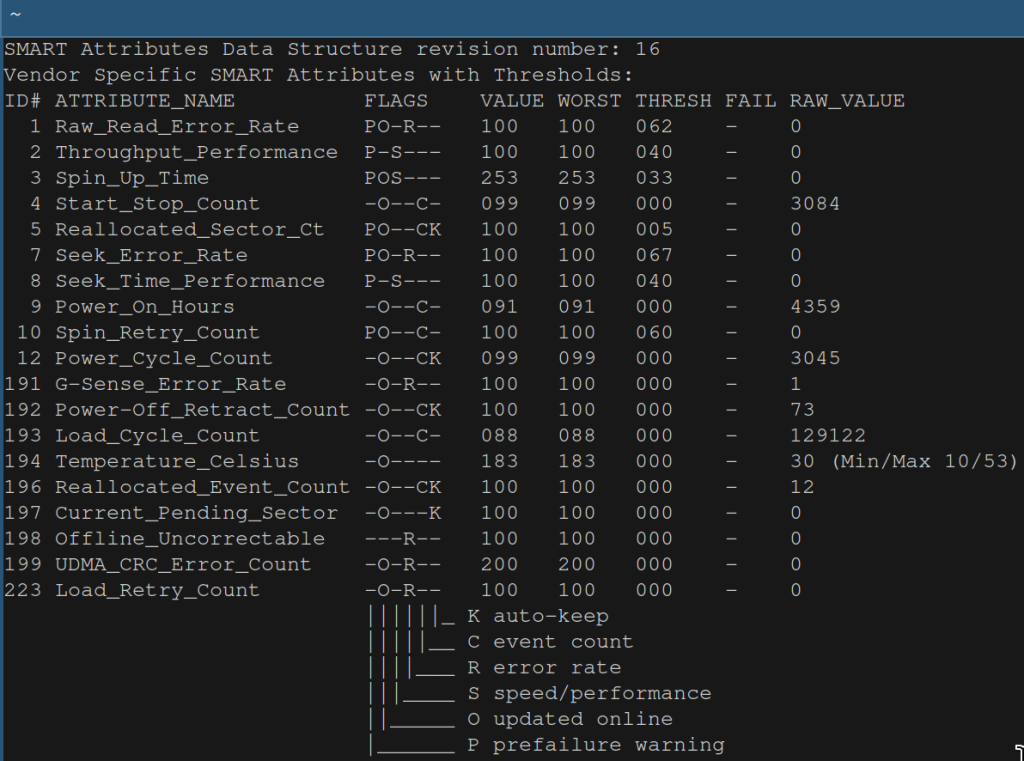
This is a table that describes certain attributes of the drive. The first point to note is that these attributes are not standardized. So there is no document that describes exactly what the attributes mean. Their exact meaning is set by each manufacturer and that information is typically not published. So the table is not as useful as it could be but there’s still quite some information it it.
The second column contains the name of the attribute. The last column its RAW_VALUE. That value typically has some physical meaning. For example, RAW_VALUE in the row with id 194 shows a value of 30, which means that the temperature of the drive was 30 degrees Celsius.
The raw values then get converted to some encoded value VALUE. That conversion takes place inside the drive so how exactly that happens is up to the manufacturer. The values can be in the range 1 to 253. A higher value is usually better. Some manufacturers don’t use 253 as the highest value for all attributes but some other value, for example 100. WORST refers to the worst value that was recorded for an attribute2. Finally, THRESH contains a threshold value which is set by the manufacturer. If VALUE falls below this threshold then there is an increased risk of drive failure.
Look here for a general description of these attributes (remember, their exact meaning varies by manufacturer). A few of them, like Read Error Rate, are quite important because they can indicate imminent disk failures.
I’ve also run the commands above with another old HDD and I got the following result. You can see in the row with id 1 that the drive has failed.
About Load Cycle Count
I’ve seen a few discussion in online forums about load cycle count. Remember that HDDs have a head which moves around to read and write data. When a disk is not used then the head can be moved into a parking position where it’s not directly above the disk. This is done to protect the disk from damage3. Load cycle count counts how often the head has been parked. Repeatedly parking the head (many thousands of times) can cause some wear and tear. Disks are typically rated for a certain number of load cycles. For example, depending on the model, WD HDDs are typically rated for 350,000 to 600,000 cycles. That’s quite a large number.
In the main part of this series I assumed that we access our NAS three times a day (which is roughly my access pattern). If the head gets parked after each access then we have three load cycles per day. That’s 1095 per year, so we’ll only reach 350k cycles after 319 years. If we access the disk once every 10 minutes then we still have more than 6.5 years before we reach 350k load cycles. So under normal circumstances we shouldn’t have to worry about the load cycle count in our NAS.
Long Selftest
In the first section we ran a short selftest. Now let’s run a more extensive test. This test is similar to the short test but it goes over the drive a lot more thoroughly.
sudo smartctl -t long /dev/sdbIt can take many hours for this test to finish. So it may be a good idea to run it overnight. Note, depending on your setup, the test may get interrupted and sudo smartctl -l selftest /dev/sdb may report an error Interrupted (host reset). In my case it worked fine on the Raspberry Pi but not on my main computer. We can prevent this error by running
sudo watch -d--cumulative -n 15 smartctl -a /dev/sdbright after we start the extended test. This command will run sudo smartctl -a /dev/sdb every 15 seconds and it will highlight any changes in the output (so we can see the progress of the test). We don’t have to use option smartctl with option -a, we could use any command that queries some information from the drive. The important point is that we regularly query the drive so that it’s kept awake.
Note, the command doesn’t stop when the selftest has finished. You’ll have to do that manually with Ctrl-c.
Scheduling Regular Checks
We probably don’t want to run the selfcheck manually for every drive in our NAS. So let’s automate those checks. I’m going to run a long self test once a month. We could use the systemd service called smartd that’s included in smartmontools. However, I don’t think it’s appropriate for our NAS so we’ll first go over using cron for scheduling checks and then briefly discuss why we’re not using smartd.
Cron
Cron is a utility that allows us to schedule when certain programs should run. We’ll use it to periodically (monthly) run a script that
- starts a self test,
- keeps the drive awake while the script runs and
- writes the output to one or multiple files on the file system.
If you set up email on your RPi then you’ll receive the result of the self test in your inbox. Unfortunately my email provider ProtonMail doesn’t support smtp-sending on individual plans (not even on the Unlimited plan!). I don’t want to set up gmail or any other ‘free’ 4 provider on my RPi so I’m going to write the result into files on each Samba share. The script can be found here. It’s a bit longer because it contains lots of checks. The script has the following signature:
nas_smart_test.py type device polling_interval output_path --output_into_subfoldersType refers to the type of self test. We’ll be using long for our monthly tests. Device is a path to the drive that should run the self test. Ideally we use a path that uniquely identifies the disk. Common labels like /dev/sdb are not fixed so they are not ideal for this usage. Let’s instead use the disk id, which we can get with ls -l /dev/disk/by-id. This command will return something like
ata-WDC_WD19SDRW-45VUVS2_WD-WX33EC15ZMDN -> ../../sdb
which tells us the id of drive sdb. Note, we want the id of the entire drive, not of a partition, so don’t use the lines with -partX at the end.
Polling_interval refers to the number of seconds between subsequent calls to the disk. This has to be small enough so the disk doesn’t go to sleep or gets disconnected. My drives go to sleep after 30 minutes. Below I’ll set the polling interval to 20 minutes.
Output_path refers to the directory where the result of the self test should be saved. If option –output_into_subfolders is specified then the results will not be saved in output_path but in each of the subfolders of output_path (so we can save the result in each Samba share).
Let’s save the script under /usr/local/bin/nas_smart_test.py and make sure it’s executable. If it isn’t then let’s make it executable with sudo chmod +x nas_smart_test.py. Finally, the command we’ll run is:
/usr/local/bin/nas_smart_test.py long /dev/disk/by-id/ata-WDC_WD19SDRW-45VUVS2_WD-WX33EC15ZMDN 1200 /nas_mounts/hdd1/shares --output_into_subfoldersThe only thing left to do is to add this command to cron. To specify a command for cron we run crontab -e. Since we need to run our command with root privileges we’ll do
sudo crontab -eThe structure of crontab is very simple. We need to enter five integers that specify when the command should be run, followed by the actual command. The integers refer to minute, hour, day of the month, month and day of the week. We don’t have to specify all values. If we want to leave one unspecified5 then we type *. We’re going to run the self test at 2am on the first of each month. So the entry in crontab is
0 2 1 * * /usr/local/bin/nas_smart_test.py long /dev/disk/by-id/ata-WDC_WD19SDRW-45VUVS2_WD-WX33EC15ZMDN 1200 /nas_mounts/hdd1/shares --output_into_subfoldersSave and exit. It may be a good idea to check if our Raspberry Pi uses the correct time. If you’re not using a GUI, run timedatectl to see if the local time is correct (cron uses local time)6.
From now on, every month a long self test will be run and the result will be saved on each share. You can always adjust the options to your liking (e.g. only save the results to one Samba share).
If you’re interested in why we’re not using smartd then keep on reading the next section.
Smartd
As mentioned above, I don’t think smartd is suitable for our NAS. By default, when smartd is active, it polls disks every 30 minutes. This prevents the disks from going to sleep. In my NAS, which sees only light usage, disks should go to sleep when they’re not being used. We can add the following line into the file /etc/default/smartmontools to extend the polling interval to, for example, one hour (1h = 3600 seconds).
smartd_opts="--interval=3600"We could increase that interval to a much larger number, e.g. to one month, so that smartd only wakes up our drives when needed7. I do find that approach quite hacky and messy though.
We can specify some smartd settings by creating or editing the file /etc/smartd.conf. One option you’d think would help here is
-n POWERMODE[,N][,q]where POWERMODE can be, for example, standby. This option prevents smartd from polling a disk that’s in standby or sleep mode. Sounds perfect for our situation but it only works for ATA devices. My HDDs are SAT devices (ATA behind an SCSI Translation Layer) so this option has no effect.
Most of my HDDs are behind a powered USB Hub which prevents them from going into low-power mode. So we could use smartd for those. But there’s also a HDD connected directly to the RPi for which smartd won’t work. Overall, it seems a lot easier to just use cron for all devices.
Footnotes:
- To install run
sudo apt install smartmontoolson the Raspberry Pi orsudo pacman -S smartmontoolson Arch. The package name will be similar on other systems. ↩︎ - Since WORST refers to the worst value we should ask what VALUE refers to. Is it the latest value? An average? I don’t know what it is. If you do, please let me know in the comments below. ↩︎
- If the head is away from the disk then it won’t touch its surface when the disk is spun-up or -down. And if there’s a shock to the disk (e.g. if you knock it over) then the head also won’t be able to damage it’s surface. ↩︎
- They are not really free, you do pay with your data. ↩︎
- If a value is unspecified then it will always match. For example, if you don’t specify month then the command will run every month (as long as the other values match). ↩︎
- If it’s not correct then that could be because not enough time is allowed for the server to respond to time update requests. You could try to open
/etc/systemd/timesyncd.confand increaseRootDistanceMaxSecto a larger value, e.g. 15 or 30. Restart the service withsudo systemctl restart systemd-timesyncd.service. ↩︎ - Smartd will run our job after a poll. So if we want the checks to be run at 2am but smartd does its monthly poll at 5pm then your check will run at around 5pm. So we’d have to be very careful to time smartd’s polling well. This approach will be even less suitable if we have multiple jobs that should run at different days and times. ↩︎
Leave a Reply