We’ve installed Greyhole and we know how to mount Samba shares on our system. In the video of the 8th post we only created one share to which everybody has access. In this post we’ll look at a few ways of restricting access to Samba shares for different users.
This post is part of a series about building a Network-Attached Storage (NAS) with redundancy using a Raspberry Pi (RPi). See here for a list of all posts in this series.
A little preface: I’m writing this post from the perspective of a Linux user. My home network consists mostly of Linux computers but there is also one Mac and one Windows computer who should be able to access the NAS. Their access is limited to reading from it so I’m not going to spend much time on Windows- or Mac-specific setups (although we will cover everything a simple home NAS should require).
Linux Permissions
For our discussion about mounting shares it’s useful to know a little bit about permissions under Linux.
By default, files and folders under Linux have permissions for three kinds of users: the owner, the owning group and everybody else. For each kind of user permissions can be any combination of read, write and execute1. For example, when you run ls -l you may see permissions like ‘-rwxr-x—‘.
- The first entry ‘-‘ indicates that we’re looking at a file (for directories the first entry would be ‘d’ instead of ‘-‘, but there are also other options).
- The next three ‘rwx’ indicate that the owner has read, write and execute permissions.
- The next three ‘r-x’ indicate read and execute permissions for the owning group.
- The last three ‘—‘ indicate that other users have no permissions.
Permissions can also be written in octal form where a 4 corresponds to read, 2 to write and 1 to execute permissions. So ‘rwx’ of the owner would be 4+2+1=7. The entire set of permissions rwxr-x— is then 760.
While the meaning of read, write and execute is quite obvious for files, it may not be as clear for directories. In short, execute permissions for a directory allow you to traverse the directory but it gives you no other rights for the directory. For example, consider the file path /A/B (folder A lives in root, folder B lives in folder A). If you only have execute permissions for A but full permissions for B then you can traverse A to get to B (e.g. with cd /A/B) but you cannot list the contents of A (so no ls /A) and you cannot change any of the other files or folders in A.
While the permissions discussed above are useful they don’t allow for very fine-grained control. More granular permissions can be managed with Access Control Lists (ACLs). They allow you to set custom permissions for individual users and groups. See here for more information.
On our RPi files are saved using Linux permissions (because our operating system Raspberry Pi OS is a flavour of Linux). But Samba has to deal with Windows, Mac and Linux clients, which use different types of permission setups. Thus, Samba has to translate between Linux permissions and the native permissions of the client2. To achieve that Samba sometimes uses ACLs to store the desired permissions.
Samba and Windows, Mac and Linux Clients
Samba was originally created for Windows. So even though we run Samba on a Linux server, it was originally intended to service Windows clients. Thus, a Windows computer connecting to the Samba server should correctly see file ownership and permissions.
Macs are not originally supported but there is an extension called fruit which should allow for better compatibility between Samba and Macs. See here for more information.
By default Linux file permissions are not supported so a Linux computer connecting to the Samba server will not see file ownership and permissions correctly.
In the original Samba version, SMB1, this was addressed with an extension to the protocol called Unix Extensions, which correctly transmitted file ownership and permissions to Linux clients. SMB1 was not very secure though, so Samba versions 2 and 3 were subsequently published and SMB1 was deprecated. Unix Extensions, however, are only available for SMB1. A set of extensions called SMB3 POSIX Extensions is intended to make SMB3 better compatible with Linux (and other UNIX variants) but these have not yet been published (as of December 2023 when I’m writing this).
So Linux’s permissions system is not readily supported by Samba. Moreover, the way Greyhole is implemented requires Unix Extensions to be turned off. What that means is that we can’t rely on Linux permissions to control file access on our NAS (at least not when we’re using Linux as our main OS). Instead we’ll have to rely on Samba’s built in access control mechanisms.
Samba Access Control Mechanism
Now let’s get to restricting access to shares. There are quite a few options we can play with. For a full list have a look at the man pages of smb.conf. One option that’s quite important is the option read only. As the name suggests, it only allows users to read from a share but not to write to it. By default the option is enabled, so nobody can write to a share. How do we activate or deactivate read only or some other option?
There’s a configuration file for Samba which is normally placed under /etc/samba/smb.conf. That file has multiple sections that start with square brackets, for example [global]. Each of the […] sections defines a share, with the exception of [global] which contains global settings and default values that apply to all shares in the configuration file. So one of the sections may be [Photography] and all options underneath it only apply to that share. The share-specific options overwrite any conflicting options in [global]. For example, a Samba share used by Greyhole could be defined as follows:
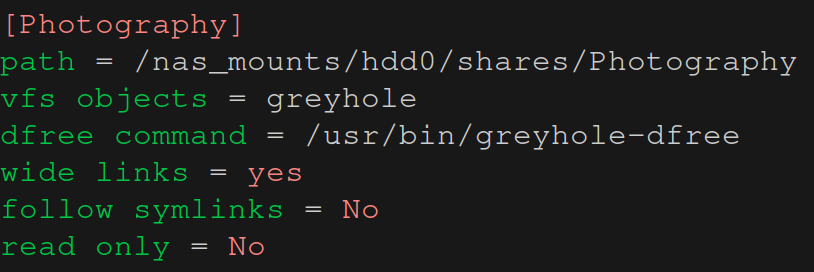
path indicates where the share should be saved. The values shown above for vfs objects, dfree command, wide links and follow symlinks are required by Greyhole3. Finally, there’s the option read only we discussed above. Setting it to No makes the share fully accessible to all users.
Most of the remaining access control options can be split into two categories: user- (and group-)based controls and file (and directory) permissions-based controls.
User- and Group-Based Controls
This set of controls allows us to restrict or permit share access of certain users. We’ll have a look at the following options:
- write list
- read list
- valid users
- invalid users
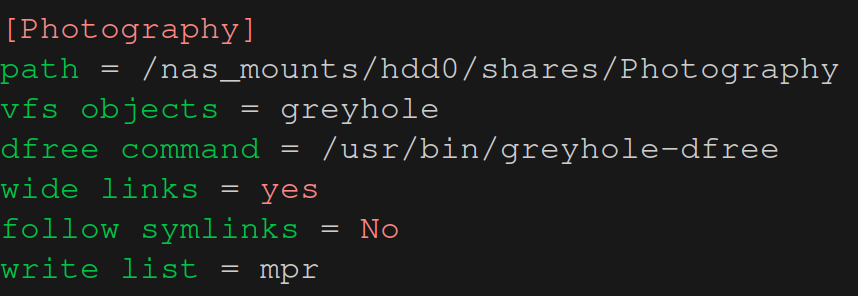
Let’s start with write list. This option gives the specified users read-write access to a share, even if the share is marked read only = Yes. So if we go back to the [Photography] example the settings below will allow user mpr to write data to it and everybody else to only read data from it (remember, by default a share is read only).
Any users specified in read list will only get read access to a share (even if read only = No).
Option valid users allows you to specify which users should be able to access the share. If a user is not on the list then they won’t be able to access it (e.g. mounting it will fail). Option invalid users is similar but specifies which user should not be able to access the share.
There are a few additional options that I’ve chosen to ignore here. One is guest ok which allows users without a Samba username and password to log in as a guest. Also, options force user and force group can be quite useful (but maybe not so much in a simple home NAS). See the link to the man pages above for details.
File and Directory Permission-Based Controls
These options allow for more fine-grained control over the permissions with which files are created. However, if you’re not careful it’s quite easy to mess up access to your share. Also, without Unix Extensions not all settings work as expected. So I’ll only discuss a very basic usage of these options. We’ll look at
- create mask
- force create mode
- directory mask
- force directory mode
Let’s start with option create mask. This option allows you to influence the permissions given to a newly created file. For example, you could set create mask = 6644. On Windows (and on Linux with Unix Extensions) these permissions represent a maximum. Say you want to create a file with permissions 7705, the actual permissions of the file will be 660. On Linux without Unix Extensions this doesn’t seem to work so well. In my tests create mask determined the actual permissions of the file. So if you try to create (or copy) a file with permissions 770 it will still end up having permissions 664.
So while this option is not as useful for Linux as it is for Windows, it’s still nice to have. By default files are created with permissions 744. I use 644 for most of my shares because on a NAS used for storing data there’s really no need to make all files executable (in fact no files need to be executable on the share).
While create mask let’s you define maximum permissions, force create mode allows you to set a minimum. For example, if you set force create mode = 775, a file you want to create with 754 permissions will end up having 775. Again, on Linux without Unix Extensions this doesn’t work. Your final permissions will be the higher of create mask and force create mode. For example, create mask = 664 and force create mode = 744 will result in 764.
Options directory mask and force directory mode work in the same way as create mask and force create mode. The only difference is that they determine the permissions of folders or directories instead of files. I use directory mask = 755 for most of my shares.
An example of a share that I’m using in my setup is shown below. Note, the 0 before 664 and 755 refers to the special and sticky permissions that we ignored earlier (and now ;-).

Changing File Permissions
After copying data onto the NAS you may want to change file and directory permissions. On Windows you can change file permissions like you would on your PC. The new file permissions will be saved in ACLs on the RPi. I didn’t find a way to change permissions on a Linux client (without Unix Extensions).
Mounting Shares with uid=username
Before we finish, let’s review something we only mentioned briefly in the previous post. In the previous post we used the command
sudo mount -t cifs //192.168.50.210/Photography /mount/point/Photography -o uid=mpr,user=mprto mount shares under Linux. Option user refers to your Samba username on the Raspberry Pi. At first glance it’s not so clear what option uid is for. Let’s try to mount a share (to which everybody should have full access) without option uid.
sudo mount -t cifs //192.168.50.210/Scratch /mount/point/Scratch -o user=mprNow let’s look at the ownership of the mount points for each of the shares. Share Photography is mounted with uid=mpr and share Scratch is mounted without uid=mpr. The other shares are not mounted.

The directory Scratch is owned by root and if we want to create a file in Scratch then we’ll get a Permission denied error, even though we should have full access. That’s because without Linux Extensions information on ownership and permissions is not transmitted correctly.

Let’s unmount the Share and remount it with option uid=mpr. This time we do have proper access.
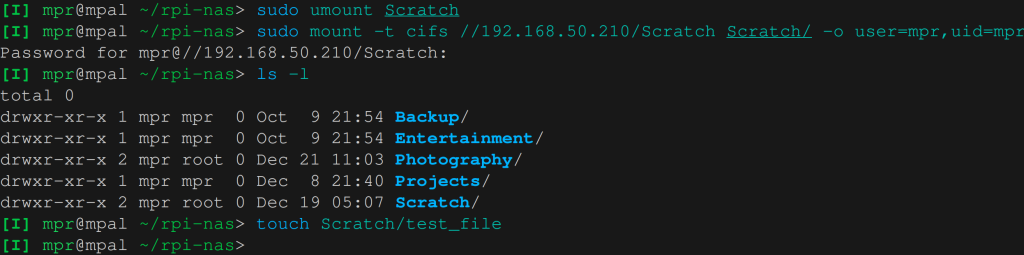
One last point. In the ls -l commands above the group of the owner is root for Photography and Scratch. That’s because we haven’t set the mount option gid=groupOfUser. We could set it but there’s no real benefit from doing so.
So that’s it. Hopefully this post contains all the information you need to start configuring your Samba shares. There are more options available than I’ve covered here but now you should know enough to find and apply them yourself.
Footnotes:
- There are also special and sticky permissions but we’ll ignore them in this post. For more information on them have a look here. ↩︎
- You can influence how this translation works by configuring some Samba options. ↩︎
- vfs objects allow you to extend or modify how Samba works. There is a list of available modules here but we won’t look at it in more detail in this post. For more information on the other options see the man pages of smb.conf. ↩︎
- 664 = read and write permissions for owner and group, only read permissions for others. ↩︎
- Windows doesn’t use Linux file permissions so Windows’ permissions are translated into Linux permissions. How this translation happens can be influenced by options like map archive, map hidden, etc. When I say ‘… you want to create a file with permissions 770…’ on Windows then I mean a file whose permissions map to 770 on Linux. ↩︎
Leave a Reply