
In this post we’re going to use the software packages Borg Backup and Borgmatic to do system backups of both our Raspberry Pi and our main computer. We’ll also schedule automatic backups using both cron and systemd.
This post is part of a series about building a Network-Attached Storage (NAS) with redundancy using a Raspberry Pi (RPi). See here for a list of all posts in this series.
During the main part of this series we set up a network-attached storage solution (NAS) using a Raspberry Pi. The software we used to provide data redundancy, Greyhole, is not suitable for storing lots of small files like those in a system backup (because of Greyhole’s overheads, see here for more information). So in this post we’ll set up a proper system backup.
We’ll be using Borg Backup, which is available on Linux and Mac. Running it on Windows is only experimental. The advantage of such a backup software (vs just manually copying data) is that it works incrementally. So only files that have changed are saved during the backup, which makes the backup faster and require less space1. It also allows us to easily encrypt our backups and we can browse through them if we just need to restore a few files. Our actual interaction with Borg Backup will happen through a helper software called borgmatic.
Let’s get on with it. First we’ll do a simple setup on the Raspberry Pi that runs our NAS. Then we’ll set up a slightly more complex version on my main computer.
Borg on the Raspberry Pi
This is going to be a very simple backup. All we’re going to back up is our configuration files and scripts so we don’t have to redo the Samba and Greyhole setup if the SD card of the Raspberry Pi stops working. There’s a great description of the installation process of borgmatic here. Below I’ll go through the steps for the specific setup on the Raspberry Pi.
Basic Setup
First we need to install the software with
sudo apt install borgmaticThis command will automatically install all required software, such as Borg Backup. Next we create a sample configuration file. On the version currently (in Jan-24) available on Raspberry Pi OS we do that with the following command.
sudo generate-borgmatic-configThis command generates the file /etc/borgmatic/config.yaml. Newer versions of borgmatic require a slightly different command, which we’ll use in the next section. Let’s open the configuration file with
sudo vim /etc/borgmatic/config.yamlIt’s quite a long file with lots of options for customization. For this simple backup we’re only using the following lines:
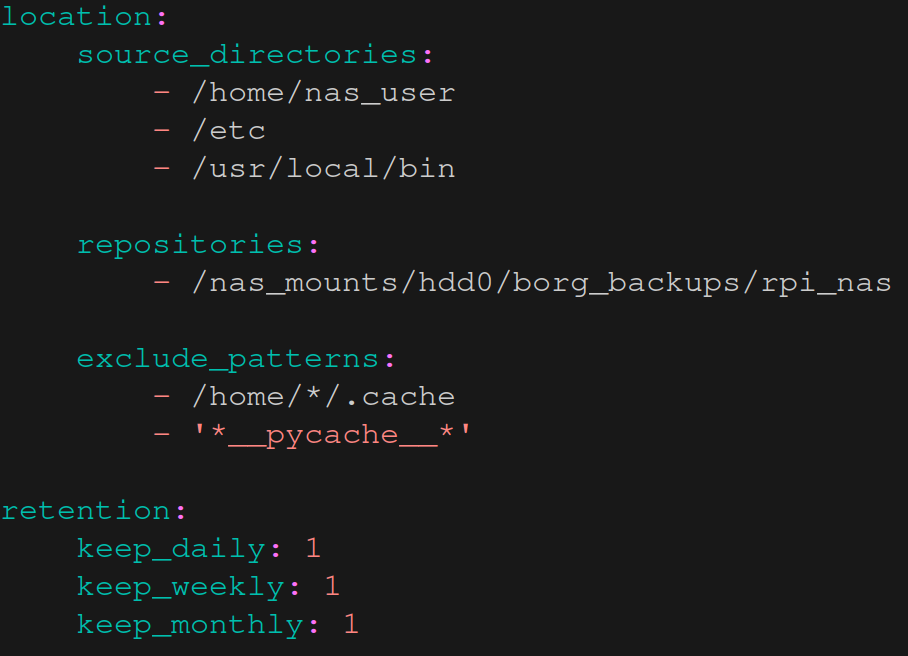
The source_directories section specifies the folders we want to back up2. Under repositories we can choose one or more locations where the backup should be saved (we can easily store them in a redundant way by adding additional locations). Section exclude_patterns allows us to define rules to skip certain files or folders3.
Finally, it’s usually not necessary to keep all backups we’ve ever made. Typically, we care most about the latest backups (occasionally older backups can be useful, e.g. if we want to recover a specific, older file). To save some space we can specify how many daily, monthly, weekly and yearly backups should be kept. That’s done in section retention. Borg/borgmatic will automatically remove backups that are in excess of what we specify there. I don’t expect the configuration files to change very often so I’m only keeping very few backups.
After closing the file we can create the repository for our backups with
sudo borgmatic init --encryption noneYou’ll notice that I’ve not set up encryption for this repository. That’s because I don’t think it’s necessary for this specific backup (there’s nothing private on there). In the next section, which backs up our main system, we will encrypt our backup.
Now let’s create our initial backup:
sudo borgmatic create --verbosity 1 --list --statsOn a larger system this command can take quite a while. On our Raspberry Pi, however, we’ve only specified a small number of folders to back up and there’s not much data in them so the initialization won’t take long.
Automatic Backups with Cron
Since we don’t want to run the command above manually (we’ll probably forget to do it + we’d have to log into the Raspberry Pi all the time) we automate them with cron. Borgmatic provides a cron script which you can download but I prefer to add the line below to the crontab file4. Let’s open it with
sudo crontab -eand add the following line

With this line there will be a backup every day at 3am and a summary will be written to the log-file saved in nas_user‘s home directory (you could also write the log file to one of the NAS’s Samba shares so you don’t have to log into the RPi to view it).
Backing up to a Remote System
Now that we’ve done a simple setup for our Raspberry Pi let’s look at something a bit more complex. I want my main computer to do a backup every 3 hours. Again the data will be saved on the storage drives of the NAS (but you could use any local or remote repository).
Basic Setup
First we need to install Borg. If you’re on a system that uses apt then you can run the same command as in the previous section. I use Arch Linux on my main system so the following command installs Borg and borgmatic (and all other requirements):
sudo pacman -S borgmaticThe backup command will be executed by the root user5 and it will run over ssh, so we have to make sure that the root user can access the Raspberry Pi via ssh. First we create a separate ssh key for our root user and save it under /root/.ssh/key_xps17_root_user (using sudo ssh-keygen). Then we create or update the file /root/.ssh/config with the following contents:

Now we copy the public key we’ve just created into the authorized_keys file on the Raspberry Pi. With this setup our root user will be able to ssh into the Raspberry Pi without being asked for a password (as long as you didn’t set a password during the generation of the ssh key).
You could also reuse the ssh key of your regular user6. Whichever key you use, make sure that it’s listed in the authorized_keys file on the Raspberry Pi (/home/nas_user/.ssh/authorized_keys) so root can connect7.
Next we generate a configuration file. On my Arch System the latest version of borgmatic is available. With this version the command to generate a config file is:
sudo borgmatic config generateThe configuration file will be saved in /etc/borgmatic/config.yaml 8. We’ll start with a simple file and then we’ll add a few useful features to it.
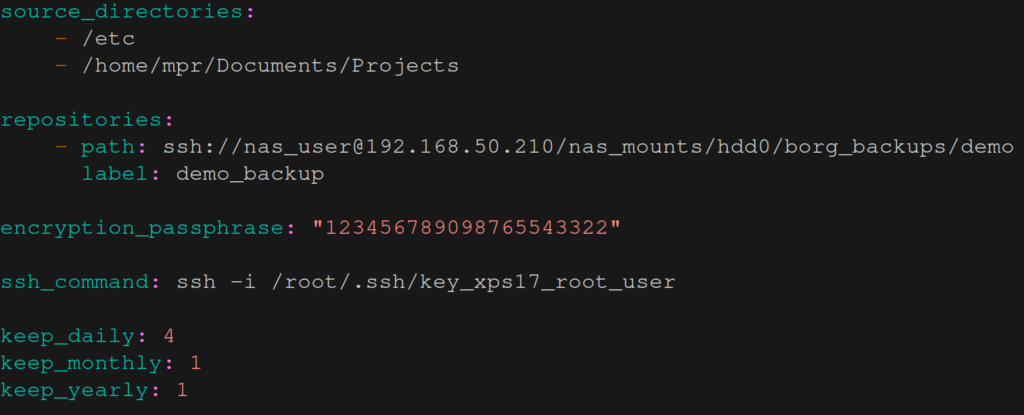
You’ll notice a few changes to the previous section. First, the repository is now remote and we connect to it via ssh. Second, we’ve added an encryption_passphrase. As a result our backups will be encrypted and can only be accessed with the password (and the key but that’s stored with the repository).
Make sure to also save the encryption password in another, secure location! Otherwise, if your computer breaks and you don’t have access to the configuration file, you won’t be able to decrypt your backups! Borg/borgmatic also recommend saving a copy of the key9.
After you’ve adjusted the configuration file to your needs we can create the repository with:
sudo borgmatic rcreate --encryption repokeyThen we export the key of the repository to the current directory so we can securely save it somewhere.
sudo borg key export ssh://nas_user@192.168.50.210/nas_mounts/hdd0/borg_backups/demo ./borg_demo_key_backupBefore we do our first backup let’s add exclude_patterns, which allow us to ignore certain files or folders:
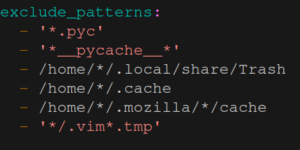
We also enable the following options
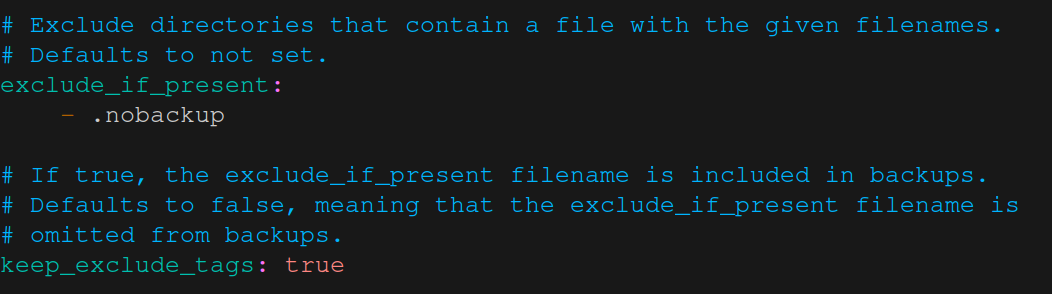
which allow us to manually exclude certain directories from being backed up (that can be quite useful in situations where some of your custom code creates a lot of temporary data).
When I set up my repository I started with a small number of directories and gradually expanded them (so I could make sure that no large, unnecessary files were saved). So let’s now create an initial backup with the command below (depending on your source directories, this may take a while):
sudo borgmatic create --verbosity 1 --list --statsAdditional Features
There are a few more features I’d like to have. First, I only want the backup to run when the remote server can be reached (e.g. there’s no point in attempting a backup if you’re on a laptop and away from home). We can achieve that by ping’ing the Raspberry Pi’s IP address and checking for a response.

Next I want to be informed when a backup is taking place. For that we’ll use Desktop Notifications. If you’re on a system like Ubuntu then you should already have a notification daemon installed. Since Arch Linux is quite bare bones10 I had to set it up myself (I use mako which works on Wayland/Sway). You can test if you have a working daemon by sending a test message:
notify-send -t 0 "hi there"With the option -t 0 your message will not automatically disappear after a few seconds but stay on screen until the user clicks on it.
This works well if the message is sent and received by the same user. In our case the message will be sent by the root user (who executes the backup) and received by our regular user. That makes it a bit more difficult because the correct session bus needs to be used when sending the message. I wrote the helper script below, which works well on Wayland11. The script is saved under /root/notify_send_to_user (the file is owned by root which has execute permissions on it).

If the root user wants to send a non-disappearing message to user mpr then it would run
/root/notify_send_to_user mpr 0 "message"You can test if it works for you by temporarily becoming root with sudo su (or using sudo) and running the command above. A notification should pop up on your desktop.
Now we adjust borgmatic’s configuration file so it informs us about the update process (replace the previous before_everything section with the one below):

This will send a message when the backup starts and when it has finished. If the RPi couldn’t be reached then we get a notification and the backup stops.
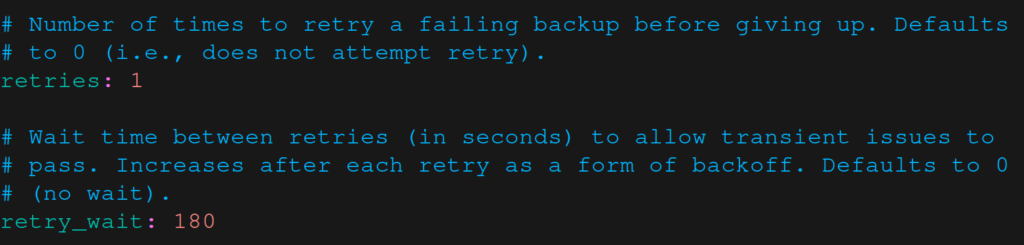
Finally, I have multiple WiFi networks at home and sometimes I’m not connected to the one with the Raspberry Pi. In that case the backup fails and I get a notification saying Couldn’t connect to rpi-nas. The options below tell borgmatic to try again three minutes later, which gives me some time to connect to the correct WiFi.
Automatic Backups with Systemd
In the previous section we used cron to automate backups. In this section we’ll use systemd. Borgmatic already provides us with the two files we need:
The first file describes the actual backup process. The second file allows us to specify when the service should be run. Download and move them to /etc/systemd/system.
If you set up notifications as described above then you’ll have to comment out the following line in borgmatic.service
# May interfere with running external programs within borgmatic hooks.
# CapabilityBoundingSet=CAP_DAC_READ_SEARCH CAP_NET_RAW
because it does interfere with our notification-sending script. You can try if the backup process works by running the service with
sudo systemctl start borgmatic.serviceThen we’ll edit the file borgmatic.timer. I want a backup to happen every three hours so I use the following settings12:
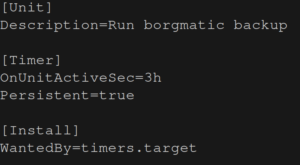
See here for details about all the options we have when configuring our timer. Finally, to activate the timer we run
sudo systemctl enable --now borgmatic.timerWe’ll do one last change to our setup. In the file /home/nas_user/.ssh/authorized_keys we’ll replace the ssh key of our root user with the following line:
command="borg serve --restrict-to-repository /nas_mounts/hdd0/borg_backups/demo",restrict ssh-ed25519 <<sshKey>> someDescriptionThis line only allows the ssh key of our root user to be used to update the Borg repository. It can’t be used to log into the RPi or do anything else but change the repo, which should add a little additional security (see here for more information).
Browsing and Restoring Backups
To mount a backup we have to make sure that FUSE is installed. On many flavours of Linux it will already be there. If it’s not (like in Arch) then search for and install an implementation of it. On my system I used
sudo pacman -S python-llfuseNow we can create a mount point, e.g. with mkdir /home/mpr/mnt, and easily mount the latest backup by running
sudo borgmatic mount --archive latest --mount-point /home/mpr/mntYou don’t have to use latest, you can mount any backup you like (you can find their names by running sudo borgmatic rlist).
There are quite a lot of options regarding mounting and browsing through backups. They are explained very well here so for more information do have a read at borgmatic’s how-to-guides (I’m not going into a lot of detail here because the documentation I linked to above is really good so there’s no point in me repeating it …).
About Hardware
If you’ve been following the main series of posts then you know that we’ve chosen HDDs for storing data. While they’re fast enough for our our main purpose of storing data, they have to spin up if they haven’t been used for a while. Since I’m doing a backup every three hours there would be a lot of spinning up and down. So I’ve decided to add the 1TB SSD (which I tested during the main series) to the Raspberry Pi, which will be used for Borg system backups and for holding Samba shares. It is not used by Greyhole as a storage drive.
So, there we have it. We’re done with another piece of the back-up puzzle. The only major functionality that’s still missing is duplicating the NAS to a remote location (so we have a proper 3-2-1 backup system). But that will have to wait for a little while …
Footnotes:
- On the website they call it de-duplicating instead of incremental. ↩︎
- /etc contains Samba and Greyhole configuration files, /usr/local/bin is where we’ve been saving some helper scripts and the home directory on this Raspberry Pi contains some additional scripts I use for other tasks. ↩︎
- This section allows for globbing as shown by the asterisks *. ↩︎
- The script provided by borgmatic works for Debian-based systems. So it does work for Raspberry Pi OS but it may not work for other Linux flavours. I prefer to use the more general way described above. ↩︎
- Our backup includes system files to which only the root user has access. ↩︎
- The ssh key of my user is managed by KeePassXC. When KeePassXC is unlocked then the key is added to the ssh agent. When it’s locked then the key is removed from the ssh agent. Having to unlock KeePassXC everytime my system wants to do an update seems cumbersome so I’ve created a separate ssh key for the root user. The permissions on this key only allow access to the root user. ↩︎
- I’m going a bit fast here, I know, but I’m assuming that you are familiar with how ssh works. If not then have a look online, there are loads of good descriptions available. ↩︎
- You can specify the location of the config file with option -d. You can also have multiple configuration files used for different purposes (see here). For example, one could be used for the system backup, another one for backing up your user data (that update process wouldn’t require root access rights). For this post we’re just going to use one file though (it’s easier to read this way). ↩︎
- The key is saved in the repository so I’m not sure how much benefit there is from an extra copy. According to this it’s to protect against software/hardware bugs. I guess it’s better to be safe than sorry… ↩︎
- Its minimal nature is my main motivation for using Arch Linux. It makes it much easier to have a small system without unnecessary programs. ↩︎
- If you’re on X.Org you may have to adjust the script. I don’t have a machine with X.Org available so I didn’t test how the script has to be changed. ↩︎
- You may have to add
Wants=borgmatic.servicein the [Unit] section of the .timer file. There seems to be a bug in systemd that sometimes prevents timers from being run, see here for the bug report. ↩︎
Leave a Reply